
Typenator
Cosi 119A - Autonomous Robotics
Team: Elliot Siegel (elliotsiegel@brandeis.edu) and Kirsten Tapalla (ktapalla@brandeis.edu)
Date: May 2023
Github repo: https://github.com/campusrover/typinator2023
Introduction
What is a better use of a robot than to do your homework for you? With the surging use of ChatGPT among struggling, immoral college students, we decided to make cheating on homework assignments even easier. Typinator is a robot that uses computer vision and control of a robotic arm to recognize a keyboard, input a prompt to ChatGPT, and type out the response.
Original Problem Statement
Demonstrate the robotic arm by having it type its own code. The arm will hold an object to press keys with. The robot will hopefully write code quickly enough so that people can watch it write in real time. The robot could also type input to chatgpt, and have a separate program read the output to the robot. It will then cmd+tab into a document and type the answer. Both of these demonstrations will show the arm “doing homework,” which I think is a silly butchallenging way to demonstrate the robot’s capabilities.
Learning Objective
The goal of this project is to demonstrate the capability of the robotic arm in conjunction with computer vision.
While the end result of the project is not actually useful in a real world setting, the techniques used to produce the end result have a wide variety of applications. Some of the challenges we overcame in computer vision include detecting contours on images with a lot of undesired lines and glare, reducing noise in contoured images, and transforming image coordinates to real world coordinates.
Some of the challenges we overcame in using a robotic arm include moving to very specific positions and translating cartesian coordinates to polar coordinates since the arm moves by rotating. We also worked extensively with ROS.
Original Goals
Text Publishing
Publish large chunks of text with ROS
Clean text into individual characters that can be typed
Send and receive data from ChatGPT
Computer Vision
Recognize keys on a keyboard
Detect letters on a keyboard (this was not used in the final project due to inconsistency)
Transform image coordinates to real world coordinates
Arm Control
Move the arm to specific positions with high accuracy
What was created
Technical Description
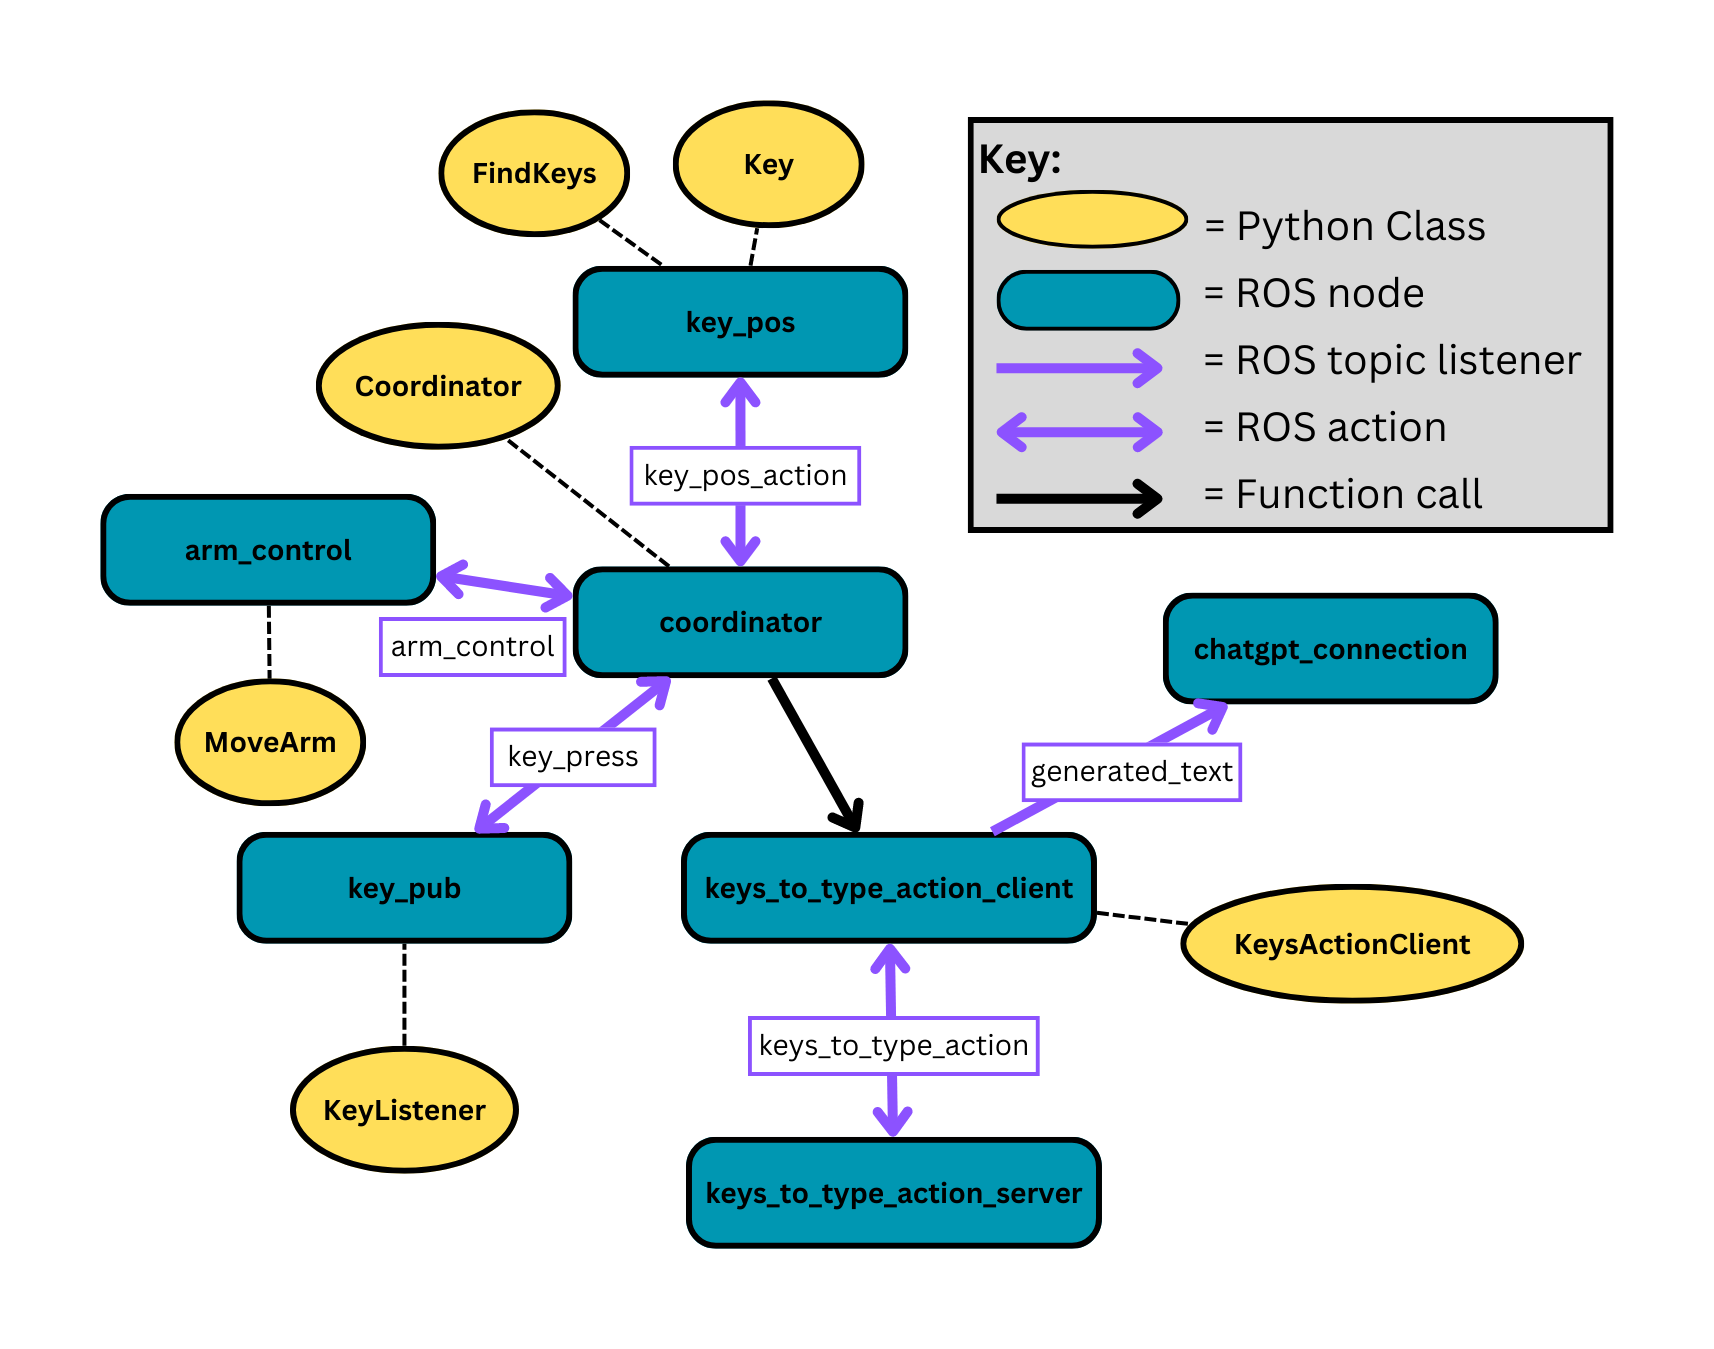
Project structure diagram
The project works by having a central coordinating node connect arm motion, image recognition, keyboard input, and text input. All of these functionalities are achieved through ROS actions except for the connection to the keyboard input, which is done through a simple function call (coordinator --> keys_to_type_action_client). Our goal with designing the project in this way was to keep it as modular as possible. For example, the chatgpt_connection node could be replaced by another node that publishes some other text output to the generated_text ROS topic. A different arm_control node could be a server for the arm_control action if a different robotic arm requiring different code was used. Any of the nodes connected with actions or topics could be substituted, and we often used this to our advantage for debugging.
Arm Motion
 Arm motion diagram
As shown above, the arm moves with rotation and extension to hover above different keys. To achieve this movement from a flat image with (x,y) coordinates, we converted the coordinates of each key into polar coordinates. From (x,y) coordinates in meters, the desired angle of the arm is determined by $θ=atan(x/y)$. The desired extension from the base of the arm is found by $dist=y/cos(θ)$. We calculate this relative to the current extension of the arm so $Δdist=dist-currentDistance$.
It was found that the arm does not accurately move in this way. As the angle increases, the arm does not adjust its extension by a large enough distance. This can be corrected for, but an exact correction was not found. One correction that works to an acceptable degree of accuracy for angles less than 45 degrees is: $((delta)/math.cos(delta)) - delta$, with $delta$ being some value between 0.07 and 0.09 (the optimized value was not determined and it seems as if the right value changes based on how far the arm is currently extended and to which side the arm is turned). This correction is then added to $dist$.
Keyboard Recognition
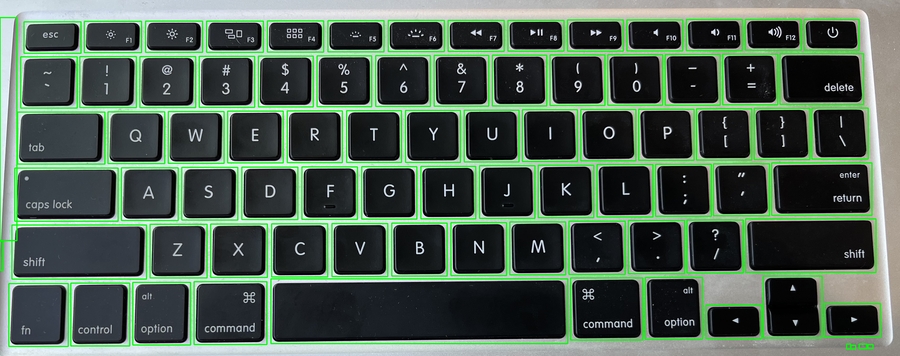 Keyboard contouring example 1
  Keyboard contouring example 2, with a more difficult keyboard to detect
Keyboard recognition was achieved with OpenCv transformations and image contouring. The keys of many different keyboards are able to be recognized and boxes are drawn around them. We were able to achieve key recognition with relatively little noise.
The first transformation applied to an image is optional glare reduction with cv2.createCLAHE(clipLimit=2.0, tileGridSize=(8,8)). Then, the image is converted to greyscale with cv2.cvtColor(img, cv2.COLOR_BGR2GRAY). A threshold is then applied to the image. Different thresholds work for different images, so a variety of thresholds must be tried. One example that often works is cv2.THRESH_OTSU | cv2.THRESH_BINARY_INV. This applies an Otsu threshold followed by a binary inverse threshold. Finally, dilation and blur are applied to the image with customizable kernel sizes.
After the transformations are applied, OpenCV contouring is used with contours, hierarchy = cv2.findContours(img, cv2.RETR_TREE, cv2.CHAIN_APPROX_NONE). External contours (those with child contours and no parent contours) are ignored to reduce noise.
Running the code
Before running the project, connect the arm and a usb webcam to a computer with ROS and the software for the Interbotix arm installed (this project will not work in the vnc). More details on the arm software are provided here.
Launch the arm: roslaunch interbotix_xsarm_control xsarm_control.launch robot_model:=px100 use_sim:=false
Calibration
Follow these instructions if the keyboard you are using has not already been calibrated.
Position the usb camera in the center of the keyboard, facing directly down. The whole keyboard should be in frame. Ideally the keyboard will have minimal glare and it will be on a matte, uniform surface. The width of the image must be known, in meters. Alternatively, an image of the keyboard can be uploaded, cropped exactly to known dimensions (i.e. the dimensions of the keyboard).
Run roslaunch typinator image_setup.launch to calibrate the image filters for optimized key detection. A variety of preset filters will be applied to the image. Apply different combinations of the following parameters and determin which filter preset/parameter combination is the best. An optimal filter will show keys with large boxes around them, not have a lot of noise, and most importantly detect all of the keys. If there is a lot of noise, calibration will take a long time.
image_file
False
Input the path to the image file you would like to use if not using the camera
reduce_glare
False
Set to True to apply glare-reduction to the image
blur
1
Apply blur to the image before finding contours. 1 results in no blur.
kernel
1
Apply a dilation kernel to the image. 1 has no effect (1 pixel kernel)
Once the tranformation preset, reduce_glare, blur, and kernel have been selected, the arm can be calibrated and run. Run roslaunch typinator typinator.launch with the appropriate parameters:
calibrate
True
Set to false if loading the keyboard from a preset
keyboard_preset
"temp_preset.json"
In calibration mode, save the keyboard to this file. Load this keyboard file if calibrate=False.
chatgpt
"Generate random text, but not lorem ipsum"
Text input to chatgpt
img_width
0
MUST SET THIS VALUE DURING CALIBRATION: Set to the the real world width of the image in meters
img_height
img_width*aspect ratio
Set this to the real world height of the image if necessary
arm_offset
0
Set this to the distance from the bottom edge of the image to the middle of the base of the arm
image_file
False
Input the path to the image file you would like to use if not using the camera
reduce_glare
False
Set to True to apply glare-reduction to the image
blur
1
Apply blur to the image before finding contours. 1 results in no blur.
kernel
1
Apply a dilation kernel to the image. 1 has no effect (1 pixel kernel)
thresh_preset
1
Apply this threshold preset to the image.
The arm will press each key it detects and save its position! It will then type the output from ChatGPT! You can open a file you want it to type into, even while calibrating.
Running from a preset
If a specific keyboard has already been calibrated, position the arm appropriately and run roslaunch typinator typinator.launch calibrate:=False keyboard_preset:="filename.json" Also set image_file if you want boxes to display current keys, and chatgpt if you want a custom input to chatgpt.
Source Files
keys_to_type_server.py
indiv_keys(): This is the callback function of Key service. It processes the text that it’s passed as its goal, and separates it by key/letter so that only one will be typed at a time. It also takes into account capital letters and inserts ‘caps_lock’ before and after the letter is added to the result list, since a keyboard only types in lower case. Furthermore, it takes into account new lines and passes ‘Key.enter’ in place of logging ‘\n’.
keys_to_type_client.py
This class subscribes to the 'generated_text' topic, which consists of the text generated by ChatGPT that the arm is meant to type. cb_to_action_server(): This is the function that sends/sets the goal for the action server, and waits for the action to completely finish before sending the result. It makes the ChatGPT message the goal of the action, and waits for the text/letter separation to complete before sending the list of individual letters of the the text as the result. get_next_key(): This function returns the first key in the deque, which is the letter that needs to be typed by the arm next.
key_pos.py
This class is used to convert key pixel positions to arm target x,y coordinates from an image of a keyboard. img_cb() and img_cb_saved(): These functions use cv2 image processing to find the individual keys on a keyboard from an image. It sets some of the class variables, such as height and width, which is then later used to calculate the conversion rates used to turn the key pixel positions into meter positions. The img_cb() function is used when it's subscribing to, and processing images from, a camera topic. Then, the img_cb_saved() function is used when an already saved image of a keyboard is being used instead of one received from the camera. Both functions essentially have/use the same code. find_key_points(): This function converts key pixel locations in the image to the physical x,y meter positions that can then be used to move the real arm so that it can hit the keys as accurately as possible on the actual keyboard. print_points(): This function prints each calculated point that has been stored in the class. The points are where we need the robot arm to move to in order to press a key. practice_points(): This function returns the entire list of points saved in the class, with the x and y meter values of the keys' positions on the physical keyboard. key_pos_action and action_response(): This is the KeyPos action and its callback function. The purpose of the action is to send the physical positions of the each key. It send real x, y, and z coordinates along with image x, image y, image height, and image width coordinates.
chat_gpt.py
This node connects to ChatGPT through an API key to generate a message/string for the arm to type onto the keyboard. It then publishes the text to the 'generated_text' topic to be used by other nodes.
arm_control.py
This file contains the sever for the 'arm_control' action, and it connects to the robotic arm. The MoveArm class acts as the link between the coordinates that the server receives and the motion of the arm.
calculate_distance() converts cartesian coordinates to polar coordinates.
set_xy_position(x, y) moves the arm to the specified cartensian x,y coordinates over the keyboard
press_point(z) moves the arm down to and back up from the specified depth coordinate
move_then_press(x,y,z) calls set_xy_position(x,y) followed by pres_point(z)
move_arm(msg) is an action callback function that calls for an instance of the MoveArm class to move the arm to the specified coordinates. It returns "True" when done.
coordinator.py
This file connects the other ROS nodes together. It runs the "coordinator" node. In "calibrate" mode, the main() uses the Coordinator class to get the image of the keyboard and find the positions of individual keys. Since these keys are not laballed, it then has the arm press each found contour. After each press, it gets the last pressed key with coordinator.get_key_press(). This uses the KeyPress action to get the stored last key press. If a new key was pressed, it is mapped to the location that the arm went to. After the arm has gone to every found position, it saves the key to position mappings in a .json file.
In "type" mode, the main() function loads one of the stored key mappings into a python dictionary. It gets the next letter to type one at a time using the get_next_key() method of a KeysActionClient. It uses the dictionary to find the location of the key, and then it send the arm to that location.
key_boxes.py
This file contains the FindKeys class. This class is used to find the positions of keyboard keys.
transform_image(img, threshold, blur, dilate) applies a transformation to an image of a keyboard with the specified threshold, blur kernel, and dilation kernel.
contour_image(img) applies image contouring and noise reduction to find the keys. It returns the contours as instances of the Key class.
keys.py
This file contains the Key class that stores the data of each individual key found from the FindKeys class. center() returns the center of a key.
key_pub.py
This file listens for keyboard input with pynput. The KeyListener class keeps track of the most recent key release and acts as the server for the KeyPress action. When called, it returns the most recent key that was pressed.
Nodes
coordinator
coordinator.py
arm_control
arm_control.py
keys_to_type_action_client
keys_to_type_client.py
keys_to_type_action_server
keys_to_type_server.py
chatgpt_connection
chat_gpt.py
key_pub
key_pub.py
key_pos_action
key_pos.py
Actions
arm_control
ArmControl
float32 x float32 y float32 z --- string success --- string status
key_pos_action
KeyPos
string mode --- float32[] positions int32[] img_positions --- bool status
key_press
KeyPress
string mode bool print --- string key --- bool status
keys_to_type_action
Keys
string full_text --- string[] keys --- bool status
Topics
/generated_text
String
Story of the project
How it unfolded, how the team worked together
We started the project with high hopes for the capabilities of the arm and image recognition software. We planned to have the arm hold a pen and press keys on the keyboard. We hoped that the keys would be recognized through letter detection with machine learning.
Initially, we mainly set up the Interbotix arm software in our vnc’s, tested the movement of the arm, and began working on keyboard recognition. Our preliminary tests with detecting the keys on the keyboard were promising. Letter detection for the letter keys was promising, however, it was not working for the special keys or keys with more than one symbol on them.
We decided that to get the main functionality of the project working, we would divide the work between ourselves.
Kirsten worked on connecting to ChatGPT, publishing the response from ChatGPT as characters on the keyboard, and transforming pixel coordinates in an image into real world coordinates in meters. We discovered that ROS nodes that perform actions will block for too long to receive improperly timed callbacks, so in order to avoid issues with this, Kirsten worked on converting letter publishing ROS topics into ROS actions. By designing our code this way, we were able to have a central ROS node that called ROS actions and got responses sequentially.
Elliot worked on moving the robotic arm so that it could move to specific cartesian coordinates and then press down. He also worked on refining the keyboard recognition and designing the central node to bring the project together. After many attempts at reducing noise with statistical methods when finding the outlines of keys on a keyboard (with OpenCV contouring), he discovered that the contour hierarchy was a much more effective way of reducing noise. With contour hierarchy and number of customizable image transformations applied to the images, he was able to consistently find the keys on keyboards.
After reexamining letter detection with machine learning, we decided that it was not consistent enough to work for the desired outcome of our project. We realized we could “calibrate” the arm on the keyboard by pressing each key that was found through OpenCV contouring and listening for keystrokes. In theory, this could provide 100% accuracy.
We encountered many difficulties when putting our pieces of the project together and running it on the real arm. As can be expected, a few small quirks with ROS and a few small bugs caused us a lot of difficulty. For example, when we first ran the project as a whole, it started but nothing happened. We eventually found that our text publishing node had a global variable declared in the wrong place and was returning None instead of the letters it received from ChatGPT.
One major issue we encountered is that the arm motor turns itself off any time it thinks it is in one position but is actually in a different position. This usually only happened after around 10 key presses, so to fix it we have the arm return to its sleep position every 6 keystrokes. Another major issue is that the arm holds down on the keys for too long. We solved this problem by turning off key repeats in the accessibility settings of the computer controlling the arm. We found that the arm has some limitations with its accuracy which affects its typing accuracy, since the keys are such small targets. It also does not seem to accurately go to specific positions. It always goes to the same positions at a given angle, but its extension and retraction varies based on its current position. It was challenging, but we were able to find a function of the angle of the arm that offsets this error fairly accurately for angles less than 45 degrees, which is what we needed. If we were starting from scratch, we would place a fiducial on the arm and track its motion to try to get better accuracy.
Our assessment
We were mostly successful in achieving our original project goals. We are able to recognize a keyboard, train the arm on that keyborad, and type an output from ChatGPT. We were not successful in using letter recognition to press found keys in real time, however, with our method of calibrating the arm on a specific keyboard, the arm was able press any key on almost any keyboard. If we manually input arm positions for each key on a specific keyboard we would likely get better typing accuracy, but this would not be in line with our initial goal. Our use of image contouring to find keys and transformations to convert pixels to real coordinates makes the project applicable to any keybaord without manual input.
Last updated
Was this helpful?